






Cómo llegué a hacer palitos para el cabello
How I Came to Make Hairsticks
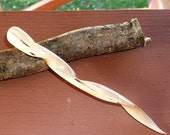
Estaba pasando el rato en el río, hacía mucho calor y había olvidado mi clip para el cabello. Así que primero trencé mi cabello y traté de meterlo debajo de la trenza con cierto éxito. Eso probablemente habría funcionado muy bien, excepto que mi cabello está cortado en capas y, por lo tanto, no se trenza herméticamente. Lo pensé un poco y decidí cortarme un palo para el cabello, una cosa cruda, pero funcionó. Lo trencé de nuevo y lo levanté y metí el palo para mantenerlo allí. Funcionó tan bien que decidí hacerlo bien y reducir uno agradable. Elegí una astilla de un árbol muerto que se torció ligeramente y comencé a reducirse. Decidí dejar el giro y lo recorté hasta que fuera del tamaño que quería. Luego raspé la madera con el filo de mi cuchillo. Al principio pensé que usaría arena para suavizarlo y eso ayudó a algunos. Entonces decidí usar la piedra que estaba usando para afilar mi cuchillo (solo una pequeña piedra del tamaño de una palma que encontré lo suficientemente plana y lisa como para usar). Jac ¡Funcionó de maravilla! Lo alisó muy bien. Si presionaba moderadamente fuerte, se lijaba muy finamente, pero si lo frotaba ligeramente, lo pulía ... Entonces decidí frotar el palo en mi cabello para engrasarlo... funcionó bastante bien. Cuando llegué a casa froté aceite de oliva sobre él para que brillara. Ahora los hago y los vendo...
Terminando la magia hoy:
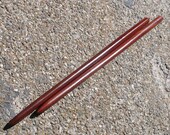
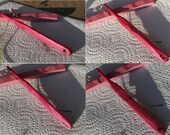
Después de que la madera ha sido moldeada con una lijadora de cinturón y una herramienta de dremel, preparo la madera para el acabado. Empiezo a lijar con papel de 100 granos, luego uso papel de lija extremadamente fino hasta que la madera esté muy, muy suave. Luego uso esmalte brillante claro. Elegí este tipo de acabado porque personalmente descubrí que a veces me ponía el pelo mojado o sudaba mientras el palo estaba en mi cabello. Quería un acabado que el agua o el sudor no arruinaran mi lápiz, aunque el acabado no es impermeable, sino más bien resistente al agua.
Los esmaltes son interesantes. Son barnices a base de petróleo, que son básicamente un acabado de tipo plástico. Muchos barnices utilizados a principios de siglo eran básicamente muy similares a estos acabados. El material de esmalte tiene una calidad especial ya que se seca. La exposición a la luz y al calor hace que las moléculas se entrelacen, haciendo una superficie muy resistente y químicamente resistente. El brillo claro que utilizo produce un revestimiento transparente que es resistente al agua y al aceite y resalta el color y el grano de la madera muy bien.
Después de aplicar el esmalte a la madera, se deja secar hasta que esté muy seco al tacto. Luego repaso cualquier carrera seria con papel de lija fina. Luego froto con un esmalte de plástico que suaviza aún más y hace que el palo brille y sea muy suave. Después, pulo con un esmalte a base de cera de abeja.
Por favor, recuerde, debido a que estos están hechos a mano, tienen pequeñas imperfecciones y deben esperarse. Esto no es necesariamente malo. Añade carácter y forma parte de lo que se trata lo hecho a mano.
I was hanging out at the river, it was very hot and I had forgotten my hair clip. So first I French braided my hair and tried to stuff it under the braid with some success. That would probably have worked very well except my hair is cut in layers and so it doesn't braid tight. I thought about it some and decided to whittle a stick for my hair, a crude thing, but it worked. I braided it again and pulled it up and stuck the stick in to keep it there. It worked so well that I decided to do it up fine and whittle a nice one. I chose a splinter from a dead tree that was twisted slightly and started to whittle. I decided to leave the twist and whittled till it was around the size I wanted. I then scraped the wood with the edge of my knife. At first I thought I would use sand to smooth it and that did help some. Then I decided to use the stone I was using to sharpen my knife (just a small palm sized stone that I found flat and smooth enough to use). Ha! It worked wonderfully! It smoothed it nicely. If I pressed moderately hard it very finely sanded, but if I just rubbed it lightly it buffed it… Then I decided to rub the stick in my hair to oil it… worked fairly well. When I got home I rubbed olive oil on it to make it shine. Now I make and sell them...
Finishing magic today:
After the wood has been shaped with a belt sander and dremel tool, I prepare the wood for finishing. I start sanding with 100 grit paper, then use exceedingly finer sandpaper until the wood is very, very smooth. Then I use clear gloss enamel. I chose this type of finish because I personally found that sometimes I would put my hair up while wet or I would sweat while the stick was in my hair. I wanted a finished that the water or sweat wouldn't ruin my hairstick, although the finish isn't waterproof, but rather water resistant.
Enamels are interesting. They are petroleum based varnishes, which are basically a plastic type finish. Many varnishes used at the turn of the century were basically very similar to these finishes. The enamel material has a special quality as it dries. Exposure to light and heat cause the molecules to interlock, making a very tough and chemically resistant surface. The clear gloss I use produces a nice clear coating that is water and oil resistant and brings out the wood color and grain nicely.
After the enamel has been applied to the wood, it is left to dry until very dry to the touch. Then I go over any serious runs with fine sandpaper. I then rub with a plastic polish that smooths further and makes the stick shinny and very smooth. After, I polish with a beeswax based polish.
Please remember, because these are handmade, they have small imperfections and should be expected. This is not necessarily bad. It adds character and is part of what handmade is about.
