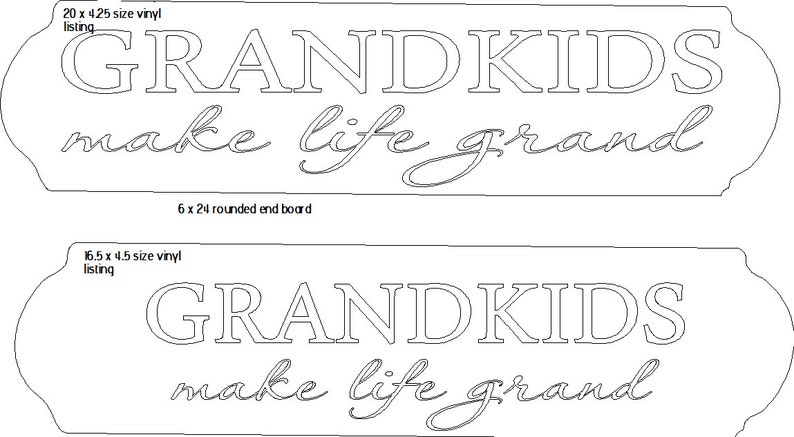
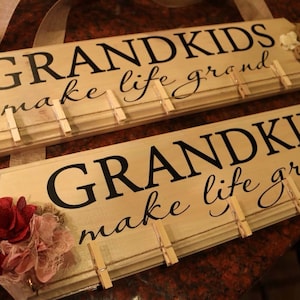
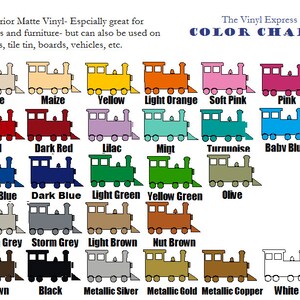
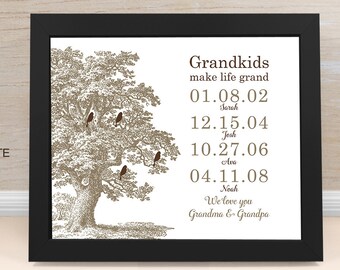
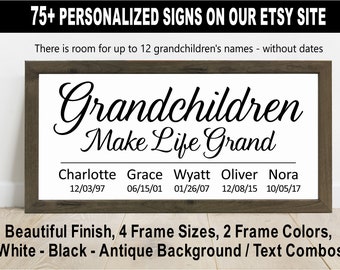
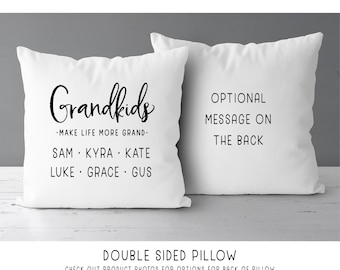
Trends in interior decor are making it harder to apply wall graphics & letters. A new kind of interior latex is coming to market that is sold as “zero VOC” or “VOC free” paint. The term VOC is an acronym for Volatile Organic Compounds. These compounds are called volatile because they are chemically unstable and degrade over time. VOCs are also found in interior and exterior house paint. As the paint dries, these compounds are given off in the fumes. This curing process generally takes three or four weeks. This is why freshly painted walls cannot be decorated with vinyl until they’re completely cured. The VOCs get trapped under the vinyl and begin to chemically interact with the adhesive, causing it to fail, or become permanently fused to the wall. Paints currently marketed as Zero VOC or VOC free include Yolo Colorhouse, Behr Premium Plus Enamel Low Luster, Benjamin Moore’s Natura® paint, and Glidden Spred®. Sherwin Williams offers several such paints including GreenGuard Emerald Interior Acrylic Latex, Harmony, Pro Industrial Zero VOC Waterborne Catalyzed Epoxy, Pro Industrial Zero VOC Acrylic Coating, and ProMAR 200 & 400 Interior Latex paint. ORACAL 631 works best on flat enamel painted walls that have been allowed to cure for at least three weeks. ORACAL recommends applying 631 to smooth, semi-gloss or gloss enamel paint. If possible, avoid matte finish Latex paints and paints that contain anti-graffiti agents or stain blockers.
Surface Challenges: Pushing the Envelope
Self adhesive plotter films were designed to replace paint in commercial signage. So they’re made to adhere to standard industry substrates like glass, aluminum, and plastics. All of these have very smooth surfaces that produce a good bond between the substrates and the vinyl’s adhesive. Putting these films on interior painted walls is pushing the envelope. So it’s important to understand what kinds of walls will and will not work with vinyl graphics. Yes I said the “N” word. It may not work. Let’s understand why.
Texture: Putting vinyl on any surface that is rough or porous seriously degrades its ability to adhere. Textured, painted walls are some of the toughest challenges in the vinyl world today. The rougher the surface, the weaker the bond with the adhesive will be. Severe textures like brick will require expensive cast vinyl such as 3M 1J8624 or MACtac RoughWrap. Unsealed concrete walls present a different challenge. They’re not that rough, but are very porous. Getting graphics to stick to such walls requires the use of a vinyl with a unique high tack adhesive like Hexis VCR200 or ORAJET 3951HT.
Paint: Most interior walls are painted. Unlike the sign industry, there isn’t a standard vinyl friendly paint in use on interior walls, so there are variables that can affect success. The two most common interior paints used are enamel and latex. Enamel is best because, like glass and aluminum, it provides a smooth non-porous surface. Latex is more porous and is not as suitable for vinyl graphic application. The bigger issue with paint is out-gassing. Freshly painted walls emit gaseous solvents until the paint cures. If these gases are trapped under an applied vinyl graphic, they may cause bubbles or react chemically with the adhesive and weaken it leading to failure. That’s right, I said the “F” word. Putting vinyl graphics on any freshly painted surface will lead to failure due to out-gassing of the substrate. ORACAL advises that you allow paint to cure for at least five days before applying vinyl graphics.
Drywall & Dust. Now that we know to wait until the paint is fully cured, we can focus on what’s under and over the paint; drywall and dust. Drywall problems can also lead to vinyl failure and can be difficult to spot. ORACAL’s Wall Graphics Installation guide advises “Moisture behind drywall…can cause the drywall paper to release. Watch for walls that back up to cooling systems, water pipes, overhead windows or windows that have been boarded up. These areas are prone to condensation that may not be obvious at the time on installation.” In other words, make sure the drywall isn’t really a wet wall in disguise.
The last surface problem to watch for is simple dust. A textured wall can hide enough accumulated dust to cause to adhere only temporarily. If you apply a wall graphic and it falls off the wall within the first 24 hours, dust may be the culprit. Fortunately, this problem is easily avoided. Just take a minute to wipe down the wall area with a dry tack cloth or a lint-free cloth before installation to make sure it’s clean and dust free. Or advise your customers to do so.
Vinyl is removable, but not reusable. While I have not had any problems removing my vinyl from walls, I am not responsible for any damage caused by removing vinyl. All vinyls come with application and removal instructions. Please convo if you have any questions about application or removal.
TIP for applying matte finish vinyl ORACAL 631:
The simple solution is heat. To achieve a better bond between the tape’s adhesive and the vinyl’s surface, simply heat the tape after you’ve masked the vinyl. This softens its adhesive and makes it more malleable so that when you squeegee the tape onto the vinyl, the adhesive fills more of those little gaps, resulting in a stronger bond between the tape and the vinyl’s face stock. The result is a smoother, easier release.
This can be done with a good quality hair dryer. (an 1875 watt blow dryer) set the heat to “high”. Here’s the process in four easy steps.
1. Heat the masked graphic for two minutes, holding the dryer about 2 inches from the tape.
2. Apply pressure with a squeegee (credit card, craft stick, etc.) to force the tape’s warm adhesive into the vinyl’s textured face stock.
3. Turn the masked graphic over, set it flat on the table – or flat against the wall, and peel the liner backwards, away from the tape. It will come off cleanly and easily.